How to Set Up Online Booking
This guide will show you how to set up your online booking.
H
ow to set services active for your Online Bookings
How to set up your department descriptions
How to setup services if you are part of a group
How to Add A Banner Image
How to Set Up Team Members to be bookable online
Online Booking Portal Links
Additional Settings
Activate Online Booking to go live
This video will guide you through how to set up your online booking system.
On SalonIQ Hub go to, Menu > Settings > Services > Choose Service > Online Bookings.
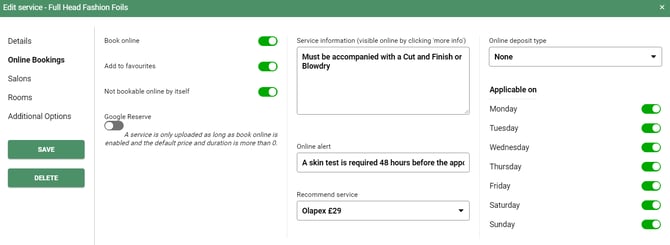
- Book online - Switch the toggle to green to activate online bookings for your salon
- Add to favourites - Switch the toggle to green to add this service to your favourites, this service will then show at the top of your online booking menu. We recommend adding your top 10 services to your favourites list
- Not bookable online by itself - Select this if another service is required at the time of booking.
- Image - Upload image to show on the booking portal
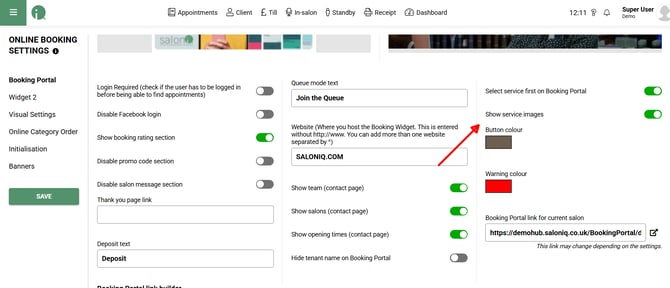
To show your service images online go to Menu > Settings > Online > Booking Portal. Turn the toggle to green to show your serviced online.
Not bookable by itself example: A colour that requires to have a Cut & Finish or blow dry and must not be booked on its own.
Additional Options - Click on the additional options tab to select upgrades and required services. Please note, these options are for the new Online Portal only.
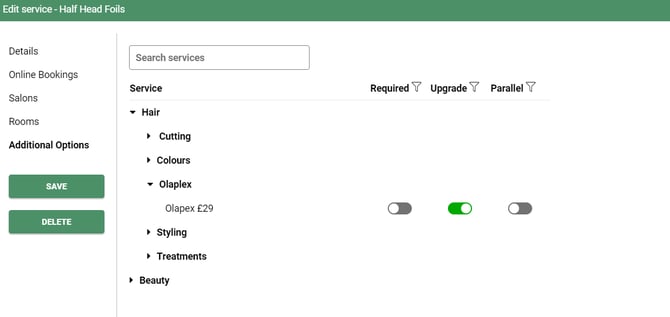
- Required - You can select multiple required services. This is used to stop clients from booking a colour online without choosing a finishing service. You can select Cut & Finish and a blow dry. Once the client selects a colour it will ask your clients to choose from the list of your required services.
- Upgrade - Select an upgrade for a service. You can upsell your treatments with each service. Once a service is selected online the client will then be offered the upgraded service.
- Parallel - This allows the client to have 2 services booked at the same time alongside each other with 2 different team members. You can select a colour & nail appointment. They will then both appear on the appointment book at the same time in the correct columns.
Once the service has been updated, don't forget to press the save button before closing.
Repeat this process for all services that you wish to be available to be booked online.
How to set up department description
Menu > Settings > Departments > Click on Department
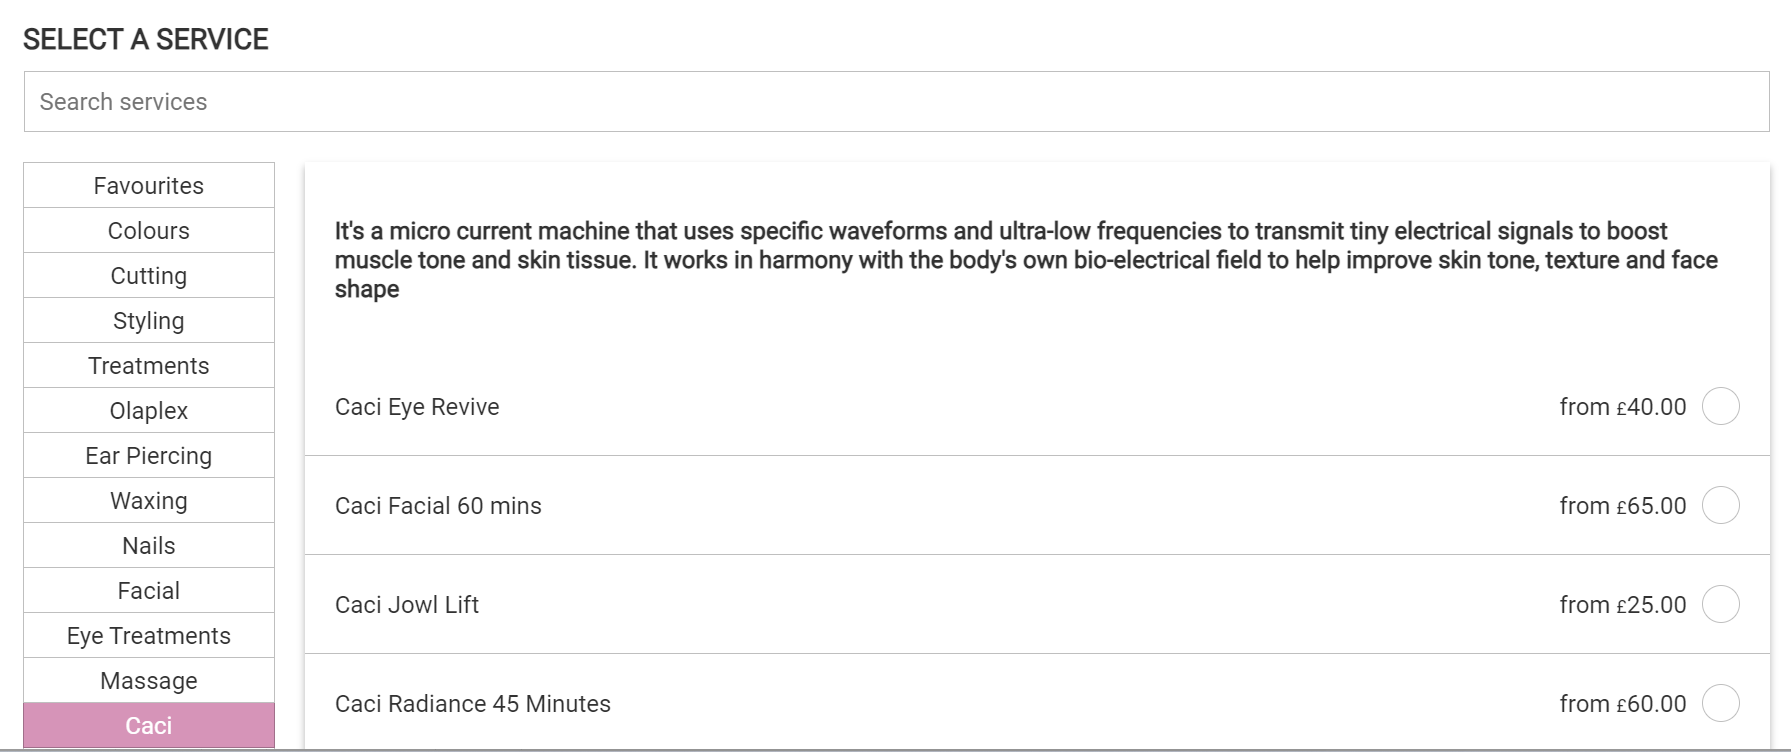
You will have a list of all your service departments. Click on the edit pencil and enter in a detailed description for the department. Example below.
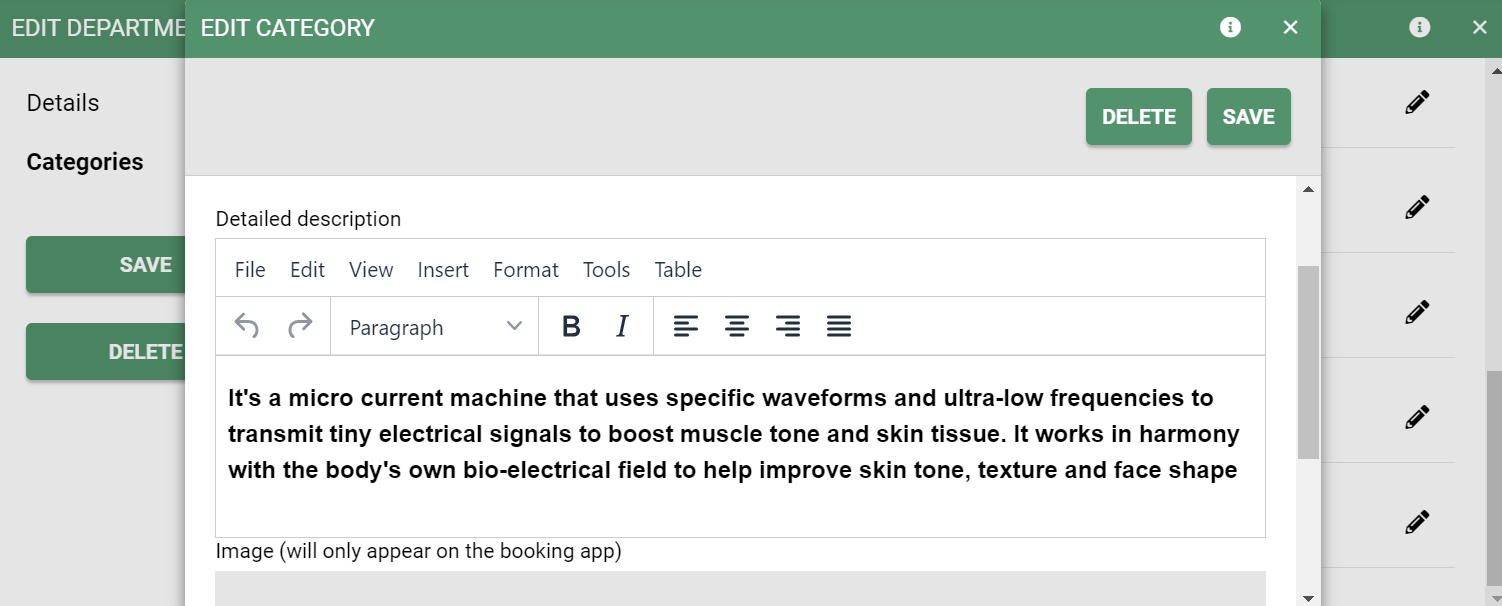
This description will then appear on your online booking categories.
Group Setup
You can decide which services are available at each salon and also if the services are bookable online at each salon
Find the service setup screen
Menu > Settings > Services
Select your service > Select Salons
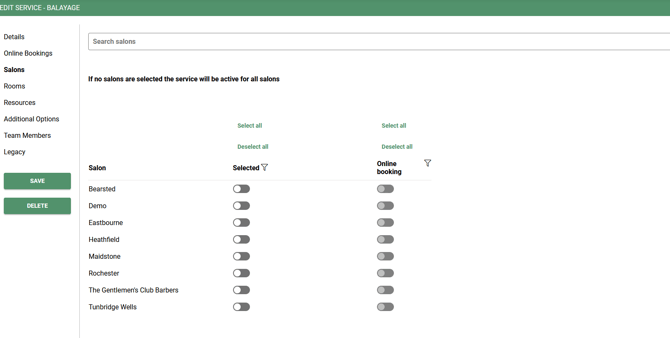
This will show all the salons and if the service is available for bookings in the salon & available for online booking.
The screenshot above shows no services selected per salon, this means that the service is bookable in salon at each location and bookable online at each location.
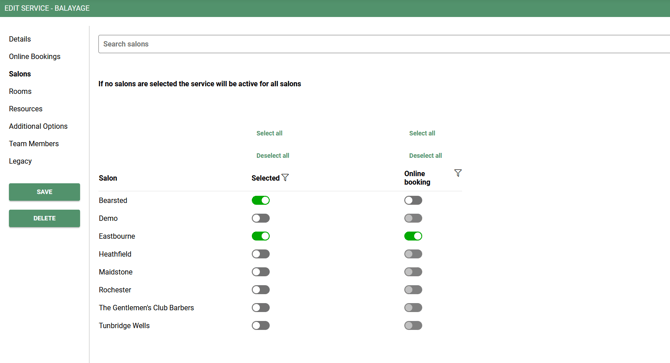
Using the toggles you can activate a service in a salon and also activate if the service is bookable online in the salon.
In the example above the service is bookable in-salon in 2 locations and bookable online in one location.
If you select any of the toggles you will automatically exclude the services from any location that is not activated or bookable online.
Press Save to complete
How to Set Up a Banner Image to show on your online bookings.
On your booking portal, you can choose a banner image for each salon.
Menu > Settings > Salons > Image > Upload Image > Select Image > Save.

How to active your team members for online booking.
Menu > Settings > Team Members > Team Members
Enable the toggle for online booking.

Please note: Check all team member skills. If a team member is skilled and the service is bookable online. See our FAQ on team skills Team Skills
How to change portal settings and get the links for my web designer.
There are many options that you can customise when settings up your online bookings. To make changes to the booking portal and how it appears online Menu > Settings > Online > Booking Portal.
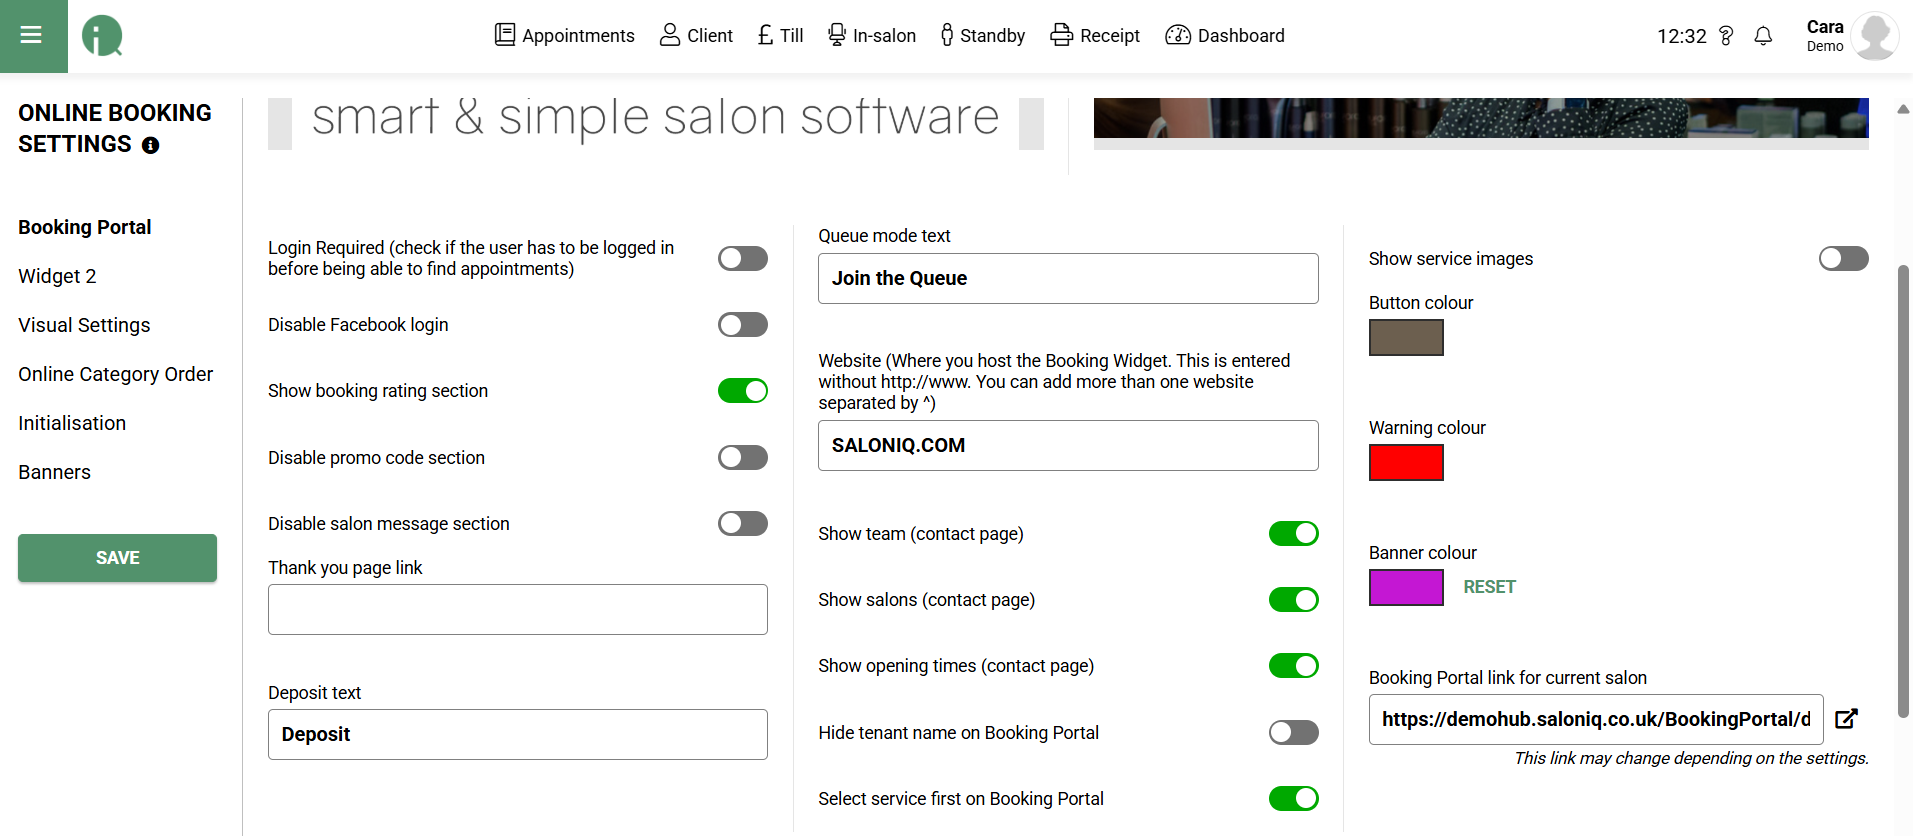
Log In Required - This will require the client to sign in before choosing a service
Disable Facebook Log in - Clients will not be able to log in using their Facebook email
Show Ratings Section - When toggle is enabled your feedback will appear on the booking portal
Disable Promotion Code - Clients will not be able to use a promotion online
Disable Salon Message - If toggle is enabled clients will not be able to leave a message for the salon.
Deposit Text - This will appear when the client pays a deposit. You can change the wording to be Reserve Booking etc.
Show Team Contact Page - If enabled will show the teams details and image
Select Service first on booking portal - If disabled the client will be asked to choose a team member before choosing a service.
Booking Portal link Builder - Change the contact drop down box to Book. The click on the reading link. This will be the link that you can provide to your web designer to add to your website.
Button Colour - This will be the default colour that will show on the booking portal.
Banner Colour - This will be the default colour that will show if you have a banner on your portal.
Additional Settings
Menu > Settings > Global > Bookings

Online New Client Email - This email will go to new clients only
Allow Multiple Team Members - Toggle on if you want the client to be able to choose multiple team members for different services.
Enable Slot Bookings - This will make all slots appear online and not just block bookings. Example - Block bookings would be 9am,10am,10am etc. Enabling all slots will show 9,9:15, 9:30.
Enable Group Bookings - When toggled on if the client already has a booking it will add any additional services if they book another appointment for the same day.
Enable Skin Test Check - When enabled if the client does not have a skin test it will ask the client to contact the salon.
Online Booking Grace Period - If you don't allow clients to book on the same day you would enter in 24 hours.
Online Booking Cut Off Period - If you want clients to only be able to book 6 months in advance.
From Price Enabled - Toggle to green if you want the default price of your services to appear online
How to activate your online booking
To activate your online booking Menu > Settings > Salons > Appointments
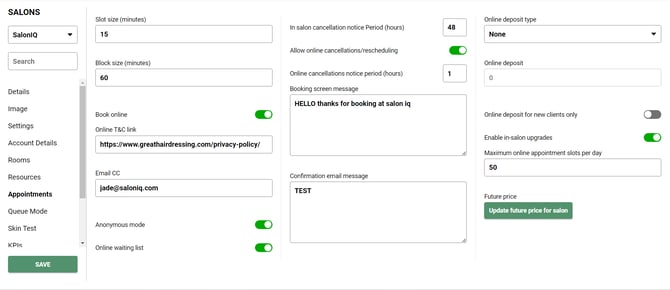
Book Online - Toggle to be in green when ready to go live
Online T&Cs Link - If you have salon terms and conditions you can enter the link here
Email CC - Enter an email if you wish to receive each time a client books
Online Waiting List - If the client cannot find their appointment they can be added to the waitlist
Allow Online Cancellations - Toggle to be switched on if you wish for the client to reschedule or cancel their booking. You can add in the notice period Example 48 hours
Booking Screen Message - This will be appear before the client completes their booking.
Online Deposits - Enter the value or percentage that you want the client to pay when booking online. Please not you will need to have a stripe account for this. Please see our FAQ Stripe
Online For New Clients Only - This will only ask new clients to pay a deposit
Maximum Online Slots - The amount of slots you want to show online
If you need any help setting up your services online, call 01892 280 123 or email help@saloniq.com
![SALONIQ_Logo-High-Res_darkbg (1) (1).png]](https://faq.saloniq.com/hs-fs/hubfs/SALONIQ_Logo-High-Res_darkbg%20(1)%20(1).png?width=141&height=79&name=SALONIQ_Logo-High-Res_darkbg%20(1)%20(1).png)