A client record card can be found either by clicking on the appointment and selecting the edit pencil at the top left corner by the client name or by searching for the client in the client search tab.
Details Tab
Appointments Tab
Notes Tab
Colourstart Tab
Alerts
Accounts
Consent
Forms
Quotes
Images
Gift Cards
Reviews
Payment Options
Client Mode
Recommendations
Client Appointment Edit Pencil
To find the client record card on an existing appointment, just click on the edit pencil next to clients name at the top left corner.

Client Card using Client Search
To find a client using the search option, select the Client Tab at the top of the screen.

You can search a client using the search bar at the top left corner using any of the below parameters
- Client First Name
- Client Surname
- Mobile Number
- Home Telephone Number
- Email Address
Once you have found the client, click on the their name in orange
Details

There are multiple sections to the Client Card, including sub sections running down the left side of your screen, the "Home Screen" for a client card by default is called the "Details" section. Each part of the Details section is detailed below.
- Title - This give's choices of the clients preferred title for example, Mr, Mrs, Sir.
- First Name - The clients first name
- Surname - The clients surname
- Address, Town, County, Postcode - The client's home address
- Mobile - The clients mobile number
- Work Phone - The clients work number
- Home Phone - The clients home number
- Email Address - The email address for the client
- New Consent - Toggle green if the client has opted in for SMS or Email
- Date of Birth - The clients date of birth
- Is child - If the client is a child, switch the toggle to green and match the child with the parent
- Occupation - The clients profession, for example, Employed, Retired, Student
- How Heard - How the client heard about the salon, for example, internet, look of salon, promotion
On the right side of the client details, we have skin test options - Last Skin Test Date - select the most recent date the client had a skin test in salon
- Beauty Skin Test Date - Select the most recent skin test for beauty services
- Image - Upload a saved image from you computer or tablet to add to the client card
- Membership Renewal - You can add a membership renewal date
- Transient Client - Toggle to green if the client is a non returning client who is only visiting the salon whilst on holiday, this allows any rebooking KPI's to not include this client
- Points enabled - You can select individual clients to receive points if a points promotion has been created
- Archived - You can archive clients away from "active clients" meaning they are no longer active
- Tags - You can create custom tags which can be found using Client Selections
Appointments Tab
You can access the Appointments section by clicking on the Appointments tab on the left.

- Future appointments- This displays any future bookings the client has made
- Past appointments - This displays historical bookings the client has had
- Deleted appointments - This displays and appointments which have been cancelled or deleted using Bill Finder
- No Show appointments - This displays any appointments the client has failed to show for
- Retail history - Displays any retail purchased by the client
Colour Notes
To access Colour notes, select the notes option on the left

This allows you to view existing colour notes or to add a new note to the client card.
To add a new note, select the Add note tab at the top right corner.

This allows you to create a new note, once added select "save"
The notes will always be shown in date order, meaning the most up to date note will be at the top right corner.

To print all notes, or the last 3 notes select the option you require from the print tabs at the top right. To print individual notes, click the 3 dots above the note you require > Edit > Print
Colour Start
This enables you to connect your Colour Start passport account to the client card
Alerts
To access client Alerts, please select the Alerts tab on the left tab

By adding an alert enables you to create the alert which will always appear on the clients booking, it will also appear when making new booking for the client.

To view an alert once added, this will appear on existing bookings and will be displayed once you hover over the clients appointment. This will be shown in a red alert box
Accounts
To access the accounts section, select from the left side

This section gives you the access to add
- Deposit required for insalon - Allow deposits to be required for individual clients when making appointments in salon
- Full payment required for booking online - Allow full payment to be required for individual clients when booking online (Stripe Account required)
- No Payment Required for booking online - If you have a regular client and you dont require a deposit when booking online. Switch this toggle on, they will then be able to make a booking without paying a deposit.
- On account enabled - Allow clients a credit amount which can be used to pay for services or products
- Enable online bookings - Allow individual clients to book online
- Points multiplier - Allow individual clients the option to gain extra points using the multiplier option
- Balance on account - Displays the amount of deposit the client has under there account and is available to use
- Future courses - Displays any outstanding course treatments the client has left to use
- Course history - Displays the history of any course treatments used historically
- Client Promotions - Add promotions to individual clients which will add automatically to bookings when made
- Clients referred - This displays any client referred by GAS promotion
- Referred by - Displays the client who recommended this client to the salon
Consent
To access Consent, select from the left side.
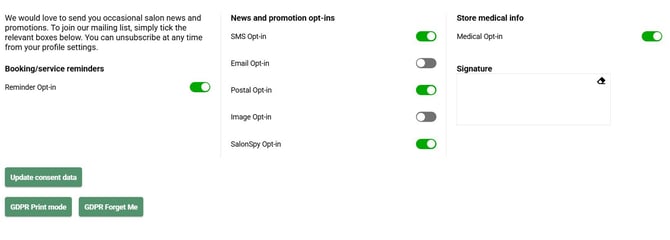
This section contains all client consent for GDPR (General Data Protection Regulation)
Each client must update their own consent, and must be updated every 12 months.
- Consent must be “freely given, specific, informed and unambiguous.”
- Requests for consent must be “clearly distinguishable from the other matters” and presented in “clear and plain language.
- Data subjects can withdraw previously given consent whenever they want, and you have to honor their decision. You can’t simply change the legal basis of the processing to one of the other justifications
- Children under 13 can only give consent with permission from their parent
- You need to keep documentary evidence of consent
- SMS Opt In - Client to receive SMS marketing
- Email Opt In - Client to receive Email marketing
- Postal Opt In - Client to receive Post marketing
- Image Opt In - Client approves images can be used on Social Media
- SalonSpy Opt In - Client accepts Salon Spy review SMS
By clicking the toggles green means the client is consenting to receive marketing in the selected fields. Always ask the client to sign and update GDPR.
Forms
To access Forms, select from the left side.

Using the forms options allows you to get client forms completed and saved to individual client cards, there are options to either use a pre-loaded allergy test or to send us forms you would like adding.
You have different options on how forms can be sent and completed
- Add - By selecting the "add" option, this loads the form onto your system allowing your client to complete the form straight away.
- Send - By selecting the "send" option, this allows you to send the form via link to the client by either SMS or Email, alternatively ask your client to scan the QR code to load the form directly to a mobile device
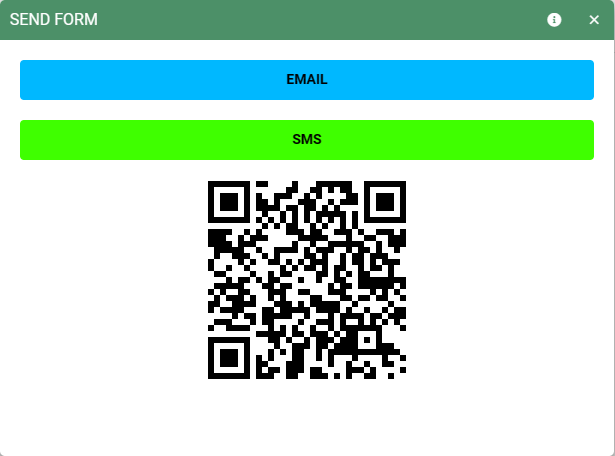
- Once the form has been completed and submitted, the form will appear as completed under the forms tab

The form will be date stamped of when the form was completed, this allows you to manage and review any forms which have been submitted.
By clicking on the form, this allows you to review the submitted form

Quotes
To access Quotes, please select from the left Side

This will display any quotes which have been saved at time of booking using the quotes tab. You can click on any saved quotes to see the details

Available options when viewing a saved quote
- Copy to Clipboard - Allows you to copy the services within the quote and drag & drop on selected day to make new appointment
- Delete - Allows you to delete the saved quote
- Print - Allows you to print the quote for the client
- Email - Allows you to email the quote to the client
- Make Appointment - Allows you to create the appointment if the "Delete existing appointment" option was switched on at time of creating quote
- Save - Allows you to save the quote
Images
To access Images, please select from the left Side

You can add images of your client if saved onto either your PC or mobile device, simply click on the "please drop/select file" option and search for the image you wish to upload.
Gift Cards
To access Gift cards, please select from the left Side

This displays the client giftcard information, for this information to be displayed, the giftcard must be matched to either the client purchasing or receiving the giftcard at time of purchase.
Details of the giftcard -
- Individual giftcard number
- Original value entered onto the giftcard
- Remaining value on giftcard
- Expiry date of giftcard
At the top right side of the giftcard are 3 dots, you can email the details of the giftcard if you press these dots

Reviews
To access Reviews, please select from the left side

This allows clients the ability to leave reviews using either:
Salon Spy www.salonspy.com
Best Salon Guide www.best-salon-guide.com
Once the client has left feedback, this will be displayed in this section and in the Mini Team Member Dashboard.
Payments
To access payments, please select from the left side

This allows you to add a "Pre-Authorised-Payment" card to the clients card, this can then be loaded at check out to pay for services or products.
Once the card has been added, the card details will be hidden from view.

You can also select a "Pre-Authorised-Card" at check out to pay for services or products, just select "show more" next to the standard payment types and select the "Pre-Authorised-Card" option.

Please note you must have an active Stripe Express account for this feature to work. If a Pre-Authorised-Payment card is used, this payment will appear in your Stripe Express account.
Subscriptions
To access subscriptions, please select from the left side

PLEASE NOTE, THIS FEATURE IS UNDER DEVELOPMENT
Stats
To access Stats, please select from the left side

This allows you to view the visit count of the client, and if you are a salon group allows you to see the last salon the client visited
Recommendations
To access Recommendations, please select from the left side

This allows you to add product recommendations to your client cards, which can be added to the basket when checking out.
By clicking "Add recommendation" this will allow you to select the team member who is making the product recommendation along with the product.

Select the product or products you wish to recommend from the list on screen.

Once selected, press "Save recommendation.

You will now see the products have been saved within the "Recommendations" tab for you to view

If the client has an appointment, you can choose to add the saved product recommendation to there basket at check out.

Alternatively, you can choose to email or SMS the client details of the product recommendation, just click on the saved recommendation and select how you wish to send this to the client

For example, if you choose to send by email, this will generate an automated email directly to the clients email address with a link to the product.

Please Note, You must have the Online Shop feature active along with a Stripe Account in order for the client to purchase the product through the Email or SMS option.
Client Mode
To access Client Mode, please select from the green tab on the left side

This enables your client to update
- Personal Details
- GDPR Consent and settings
- Forms
- Upload and remove images
- Add Pre-Authorised-Cards
The Client Mode option can be accessed by the client either by
- Scanning the QR Code
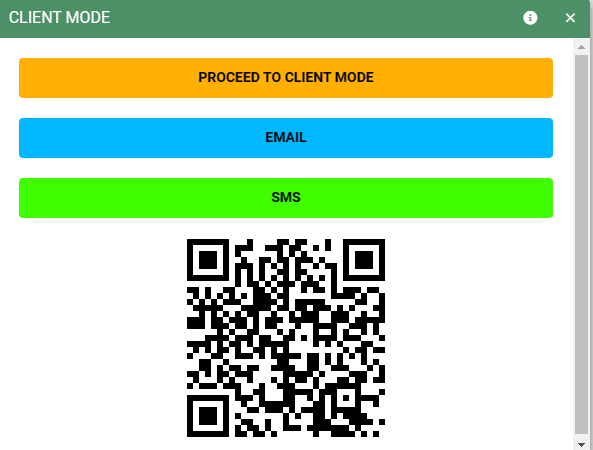
- Selecting the Email Option, which will send the client an email with the Client Mode link within

- Selecting the SMS option which will send a SMS to the client with the Client Mode link within

- Proceed to Client Mode will load the Client Mode onto your device which can be edited / completed by the client

Once any information has been edited or completed by the client, they must select "Save" which will automatically update the changes to Salon IQ.